
Last updated August 14, 2026. Reviewed against official docs May 21, 2026.
How to test subscriptions across Stripe, Apple, and Google Play
Testing subscriptions means checking the full path from a test purchase to the answer your app uses for access. You create a test subscription, let the payment provider send SubTru a webhook, and ask SubTru whether that user should have access.
A webhook is a message a payment provider sends when something changes. An access check is your app asking whether a user can use a paid product right now. This page shows how to test that flow for Stripe, Apple App Store, and Google Play.
Contents
- Before you start
- What a passing test proves
- Keep test and live data separate
- Test a Stripe subscription
- Test an Apple App Store subscription
- Test a Google Play subscription
- Verify the result in SubTru
- Common subscription testing mistakes
- Frequently asked questions
Before you start
You need a SubTru project, a test user ID from your app, and at least one payment provider account. A payment provider is the service that takes the subscription payment, such as Stripe, Apple App Store, or Google Play.
Use the same test user ID in two places. First, pass it to the payment provider when the user starts a test subscription. Then use it when your app asks SubTru for access. That is how SubTru connects the provider subscription back to a user in your app.
What a passing test proves
A useful subscription test proves four pieces work together. The provider creates a test subscription. SubTru receives the provider webhook. SubTru links the subscription to a user in your app. Your app can read the final access answer.
| Provider | Test source | How SubTru finds the user | Expected result |
|---|---|---|---|
| Stripe | Test mode subscription | subtru_external_user_id | SubTru receives the event and access matches the test subscription. |
| Apple | Sandbox purchase | appAccountToken | SubTru receives a sandbox notification and links it to the matching UUID. |
| Google Play | License tester purchase | setObfuscatedAccountId | SubTru receives a Google notification, fetches the purchase, and returns the matching access answer. |
Keep test and live data separate
Test data should never change live access. In SubTru, Test and Live are separate environments. A subtru_test_... API key reads test data. A subtru_live_... API key reads live data.
Webhook URLs are separate too. Create provider webhook keys while the SubTru dashboard is in Test mode. Then use those Test webhook URLs in Stripe test mode, Apple sandbox settings, and Google Play test delivery.
Each provider also says whether an event is test or live. Stripe uses livemode. Apple marks notifications as sandbox or production. Google marks license tester purchases with testPurchase. SubTru checks these values before saving subscription state.
Test a Stripe subscription
Stripe is usually the simplest provider to test because Stripe test mode, which Stripe may label as a sandbox in the Dashboard, works like Stripe live mode but without charging a real card. An end-to-end test is not about choosing the Dashboard or the CLI. It means your app creates a Stripe test subscription, Stripe sends the resulting webhook to SubTru, and SubTru updates access for the user.
Stripe sends test webhooks to the same SubTru Webhook URL whether you create the endpoint in the Stripe Dashboard or forward events with stripe listen using the Stripe CLI. The only thing that changes is where you get the whsec_... signing secret.
- Create the SubTru webhook URL first. In the SubTru dashboard, open your project, switch the environment selector to Test, and open Webhooks. In Create webhook key, choose Stripe. If you do not have a Stripe signing secret yet, leave Webhook secret for Stripe blank. Create the key and copy the returned Webhook URL. For normal SubTru projects, use that URL even though it is hosted on the production SubTru API domain. The webhook key and dashboard environment tell SubTru this is test data.
- Send Stripe test events to that URL. For the hosted path, open
dashboard.stripe.com/test/webhooks. In the Stripe Dashboard, this area is Workbench, then Webhooks.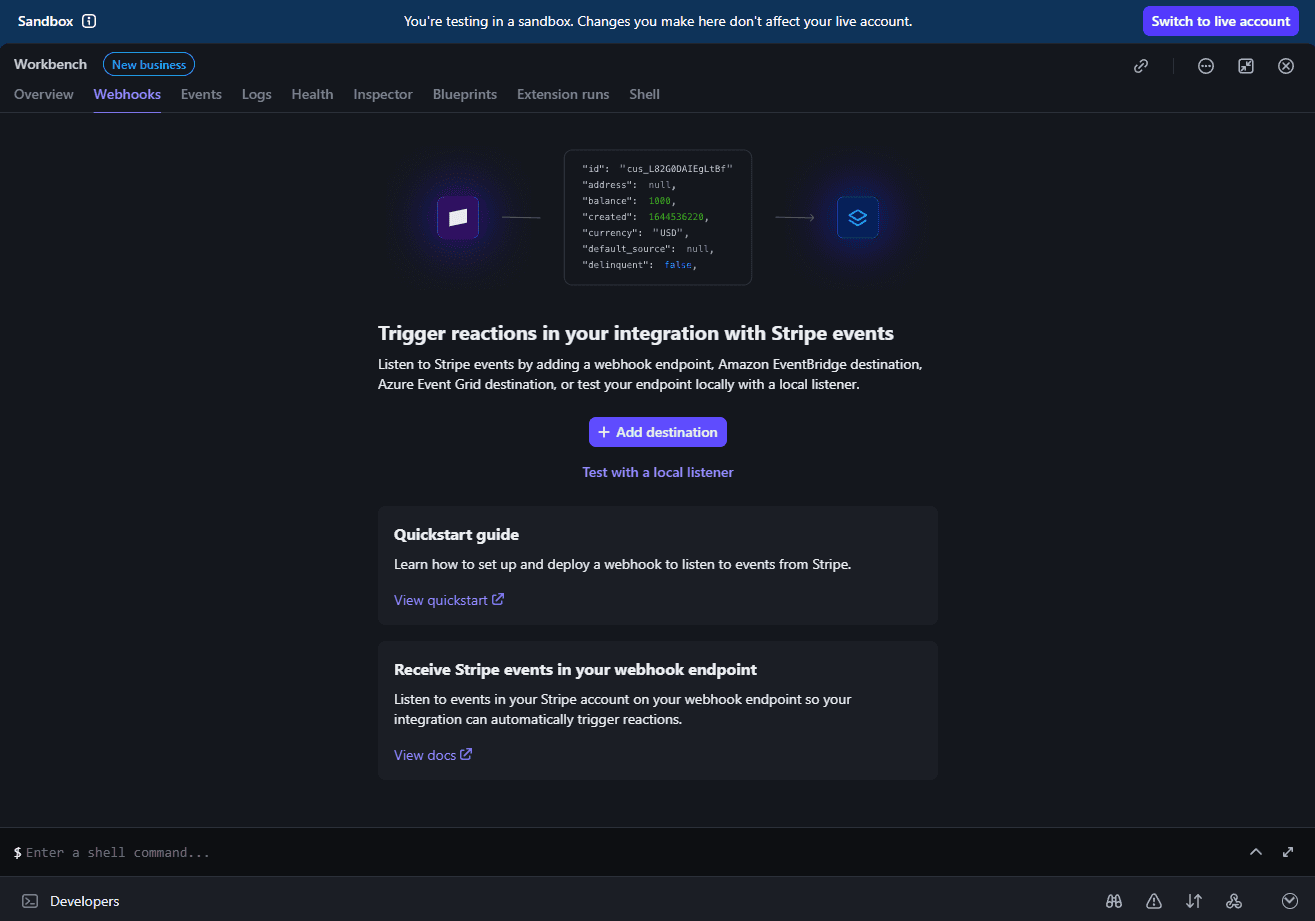
In Stripe test mode or sandbox, open Workbench, then Webhooks, then choose Add destination. - Choose Add destination.
- In Event destination scope, choose Your account for normal subscription tests. That means Stripe will send events from resources in your Stripe account. Connected accounts are for Stripe Connect resources and are outside this test path.
- For API version, choose Clover for now. SubTru expects normal subscription snapshot events with a subscription object in
data.object, so do not use Dahlia, preview versions, or thin-event settings for this test unless you have confirmed them in the SubTru Events tab. - In Events, expand Customer, then select
customer.subscription.created,customer.subscription.updated, andcustomer.subscription.deleted.Do not select
customer.subscription.pausedfor this test. SubTru currently handles pause changes throughcustomer.subscription.updatedwhen Stripe sends the updated subscription object.Selecting all Customer events is not harmful, but it adds noise. SubTru ignores customer profile, discount, source, and tax ID events for subscription access.
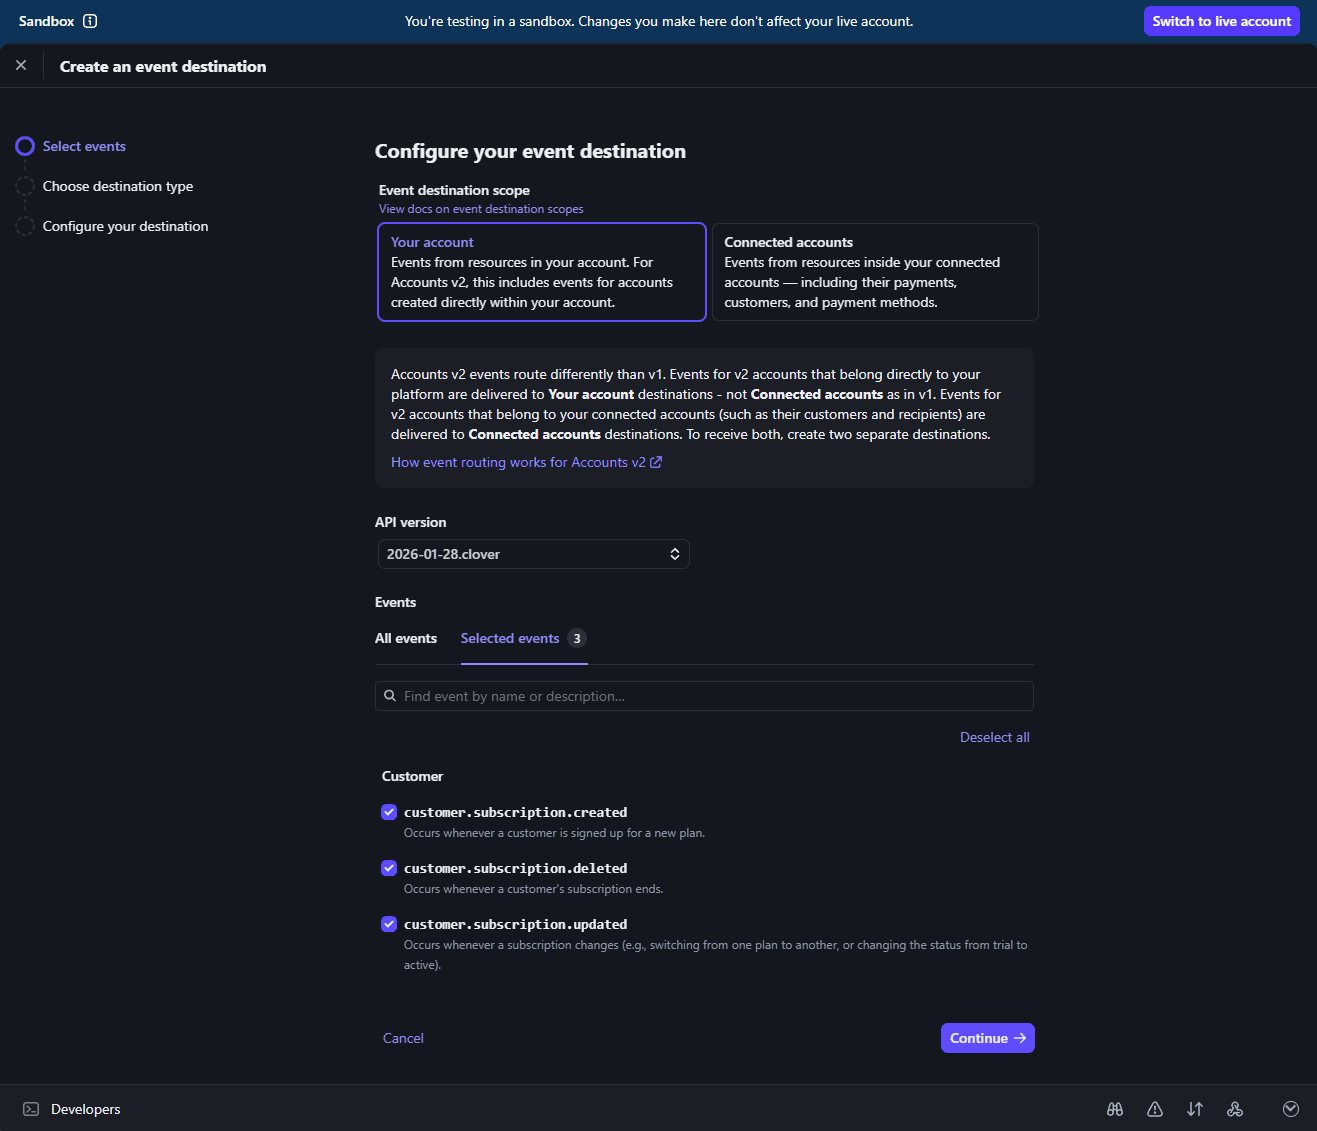
Choose Your account, choose Clover, and select the three customer.subscription events. - Continue to Choose where you want to send events. For Destination type, choose Webhook endpoint and continue.
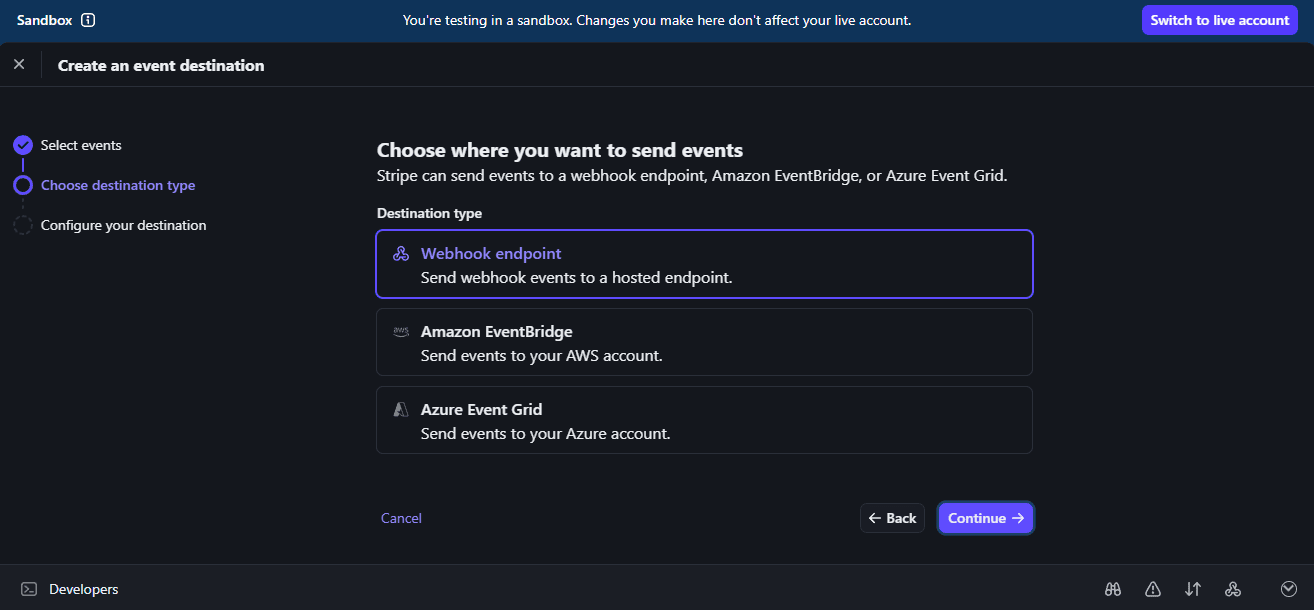
Choose Webhook endpoint as the destination type. - On Configure destination, confirm the API version is
2026-01-28.clover - Use Stripe's generated destination name or enter a name you will recognize, such as
subtru-testorsubtru-test-subscriptionsfor example. The destination name is only a label inside Stripe. SubTru does not read it. - Paste the SubTru Webhook URL you generated in the SubTru UI into Endpoint URL. Then create the destination.
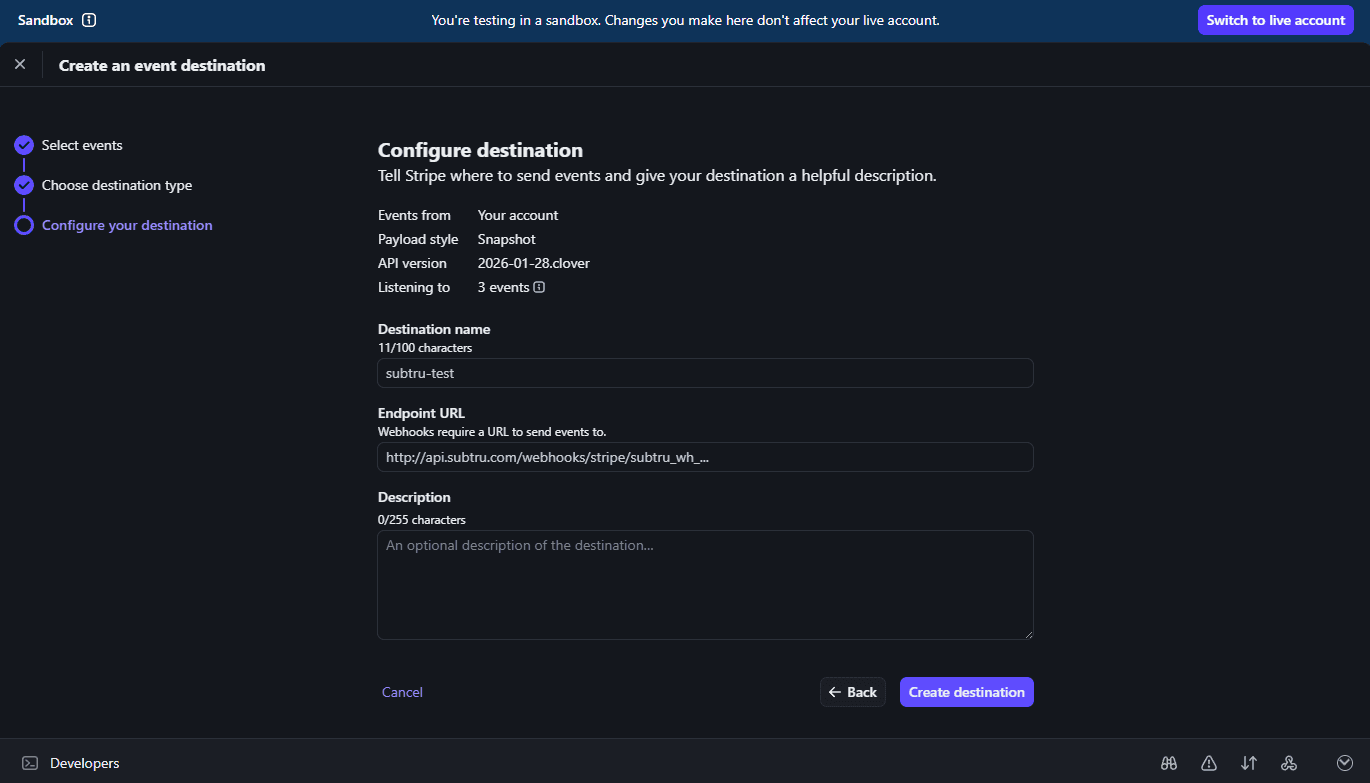
Confirm clover, set destination name, and paste the SubTru Webhook URL into Endpoint URL. - After Stripe creates the destination, Stripe shows the destination details page. Copy the webhook signing secret from that page. If the secret is hidden, click Reveal secret near the top first. The secret starts with
whsec_.... Return to the SubTru webhook key you created and save that secret on the key.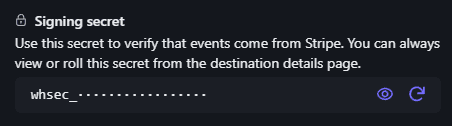
Copy the webhook signing secret from the Stripe destination details page, then save it on the SubTru webhook key. - For CLI forwarding, run
stripe listenwith the SubTru Webhook URL as the forwarding target, then save the signing secret printed in the terminal. A Dashboard endpoint and a CLI listener have different signing secrets. Do not mix them. Stripe documents this in its webhook signature guide.
Stripe's webhook testing docs explain the test-mode endpoint setup.
- Add the SubTru user ID to the Stripe subscription. SubTru needs to know which user owns the subscription. Set
subtru_external_user_idon the Stripe Subscription metadata when you create the test subscription. If you use Checkout, pass that value throughsubscription_data.metadata, which Stripe documents on the Checkout Session create API. Use the same user ID your app will pass to SubTru later. - Create the subscription through your app's Stripe test flow. Use the same Checkout flow or Subscription API call your app will use for real subscriptions, while Stripe is in test mode or sandbox. Complete checkout with a Stripe test card. This gives SubTru a test webhook that looks like the webhooks your app will rely on in production.
- Check that SubTru received the webhook. In SubTru, stay in Test mode and open the Events tab. Look for a Stripe
customer.subscription.createdorcustomer.subscription.updatedevent for the same user ID. The event should show a success status. Then open the User access explorer for that external user ID and confirm access changed. - Use generated events only for quick delivery checks. A Stripe CLI event can help confirm that the webhook URL receives Stripe traffic, but it should not be your final access test.
stripe trigger customer.subscription.created \ --override subscription:metadata[subtru_external_user_id]=test-user-123 - Use Test Clocks for time-based changes. Stripe Test Clocks let you test renewals, trial endings, past-due states, and cancellations without waiting for real billing periods.
- Confirm the event is test data. Stripe marks test events with
livemodeset tofalse. SubTru expects that value on a Test webhook URL. For now, use one Stripe price per test subscription because SubTru expects one subscription item.
Test an Apple App Store subscription
Apple uses a sandbox for App Store subscription testing. A full Apple test means your app starts a StoreKit sandbox purchase, Apple sends a sandbox server notification to SubTru, and SubTru updates access for the user.
- Create the SubTru Apple webhook URL first. In the SubTru dashboard, open your project, switch the environment selector to Test, and open Webhooks. Create an Apple webhook key. Copy the Apple Webhook URL.
- Add the SubTru URL to App Store Connect. In App Store Connect, open Apps, select your app, then under General, select App Information. Scroll down to App Store Server Notifications. Under Sandbox Server URL, paste the SubTru Apple Webhook URL, and save. Use the sandbox URL field for this test, not the Production Server URL field. Apple's App Store Connect help show where the sandbox and production URLs are configured.
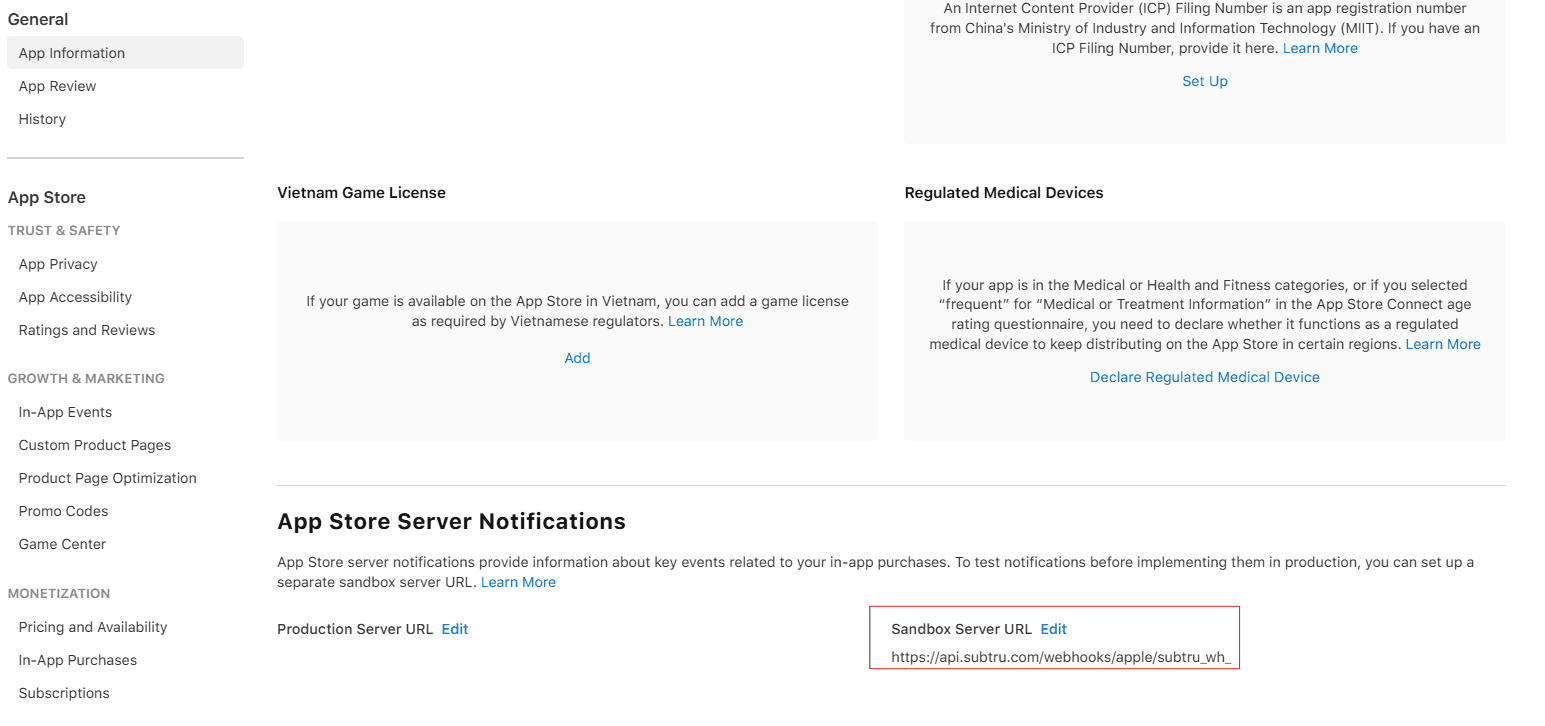
Paste the SubTru Apple Webhook URL into Sandbox Server URL for this test. - Save the Apple app details in SubTru. Stay on the App Information page in App Store Connect. In General Information, find Bundle ID and Apple ID. Return to the SubTru Webhooks page and open Apple provider config. Copy Bundle ID into Bundle ID. Copy Apple's numeric Apple ID into App Apple ID. This is the app identifier, not the Sandbox Apple Account you use to test a purchase. Apple's App information reference explains both fields.
- Create a Sandbox Apple Account. In App Store Connect, create a Sandbox Apple Account. Use an email address that has not already been used as an Apple Account or for App Store purchases. Install a development or TestFlight build, then use that sandbox account when you buy the test subscription.
- Pass the SubTru user ID to StoreKit. SubTru needs a user ID on the Apple transaction. Apple calls this value
appAccountToken. It must be a UUID. If your app user ID is not already a UUID, create a stable UUID once, store it on your backend, and keep the mapping to your app user. Use the same stored UUID when you check access in SubTru. Apple documentsappAccountTokenas a StoreKit purchase option.guard let appAccountToken = UUID(uuidString: currentUser.appleAppAccountToken) else { throw PurchaseError.missingAppAccountToken } let result = try await product.purchase(options: [ .appAccountToken(appAccountToken) ]) - Create the subscription through your app's sandbox flow. Use the StoreKit flow your app will use for real App Store subscriptions, but sign in with the Sandbox Apple Account. Buy the subscription from the development or TestFlight build. This gives SubTru a sandbox notification that looks like the Apple notifications your app will rely on in production.
- Use Apple test notifications only for delivery checks. Apple lets you request a
TESTnotification from the App Store Server API. That can prove Apple can reach the SubTru URL, but it does not create a subscription or change access.curl -X POST \ "https://api.storekit-sandbox.apple.com/inApps/v1/notifications/test" \ -H "Authorization: Bearer {app_store_connect_jwt}"Apple's notification testing docs explain this flow. The Get Test Notification Status endpoint checks whether Apple delivered a requested test notification.
- Check that SubTru received the sandbox notification. In SubTru, stay in Test mode and open the Events tab. Look for an Apple event from the sandbox environment. A normal sandbox test may start with
SUBSCRIBED.INITIAL_BUY, then show severalDID_RENEWevents because sandbox renewals are accelerated. If auto-renewal stops, Apple may send anEXPIRED.VOLUNTARYevent. The repeated renewal events are expected. The event should show a success status and theappAccountTokenvalue. Then open the User access explorer for the same UUID and confirm access changed.
Test a Google Play subscription
Google Play testing has more setup than Stripe or Apple. A full Google Play test means your app creates a license tester purchase, Google sends a Real-time Developer Notification through Pub/Sub, SubTru fetches the purchase from Google, and SubTru updates access for the user.
- Create the SubTru Google webhook URL first. In the SubTru dashboard, open your project, switch the environment selector to Test, and open Webhooks. Create a Google webhook key. Copy the Google Webhook URL.
- Paste the SubTru URL into Google Cloud Pub/Sub. The SubTru Google Webhook URL goes in Google Cloud, not directly in Play Console.
- In Google Cloud Console, search for Pub/Sub, then create or select the topic you will use for Google Play notifications.
- Create a subscription for that topic and set Delivery type to Push.
- Paste the SubTru Google Webhook URL into Endpoint URL.
- Enable authentication and choose the service account that should identify Pub/Sub to SubTru. Copy that service account email. You will paste the same email into SubTru's Google provider config later.
- Leave Audience blank. Pub/Sub will use the Endpoint URL as the audience, and SubTru derives that same value from the webhook URL.
- For the remaining settings, keep the defaults. For long-lived test or production connections, set Expiration period to Never expire.
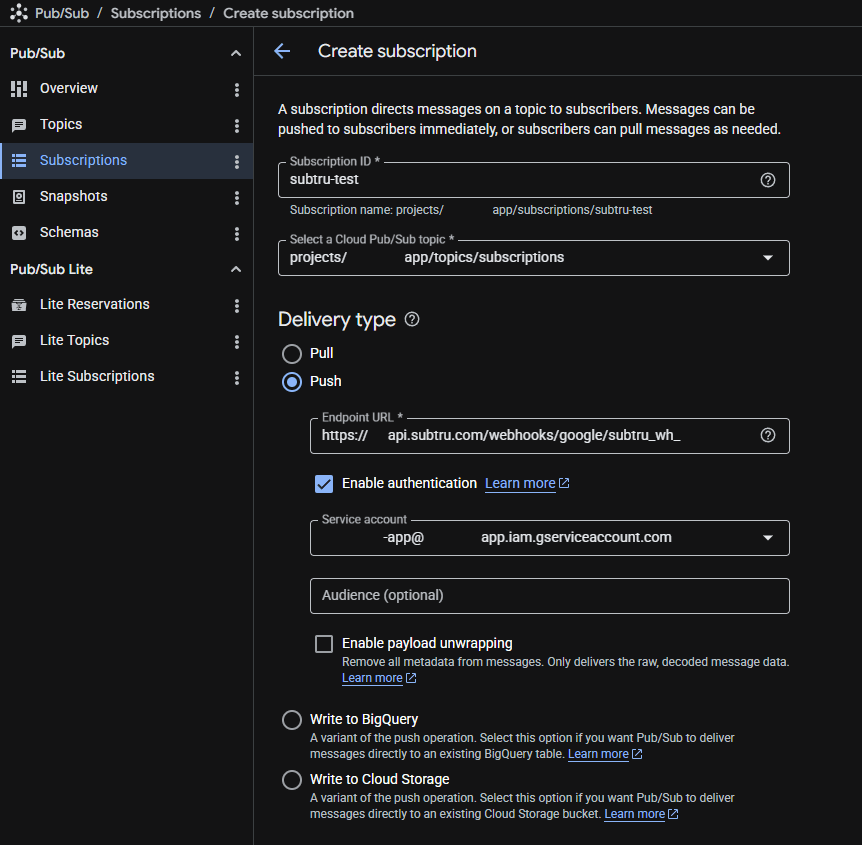
Create a push subscription, paste the SubTru Google Webhook URL into Endpoint URL, enable authentication, and leave Audience blank. You do not need transforms, filters, exactly once delivery, ordering, or dead lettering for the first SubTru connection test.
Google's Pub/Sub push authentication docs describe the service account and audience settings.
gcloud pubsub subscriptions create {subscription} \
  --topic={topic} \
  --push-endpoint="https://api.subtru.com/webhooks/google/{webhookKey}" \
  --push-auth-service-account="{serviceAccountEmail}"
This command omits the audience flag on purpose. Pub/Sub will use the push endpoint URL as the audience.
- Connect Google Play to the Pub/Sub topic. Now tell Play Console which Pub/Sub topic should receive Google Play subscription notifications.
- After creating the subscription in Google Cloud, open the Google Play Console in a new browser tab or window.
- Select your app, go to Monetize with Play, then Monetization setup.
- Find Real-time developer notifications and enable real-time notifications.
- For Notification content, choose Subscriptions, voided purchases, and all one-time products. This setting only controls what Google publishes to Pub/Sub. Currently, SubTru only uses subscription notifications and ignores unsupported non-subscription notifications, as one-time product access is not currently supported but may be in the future.
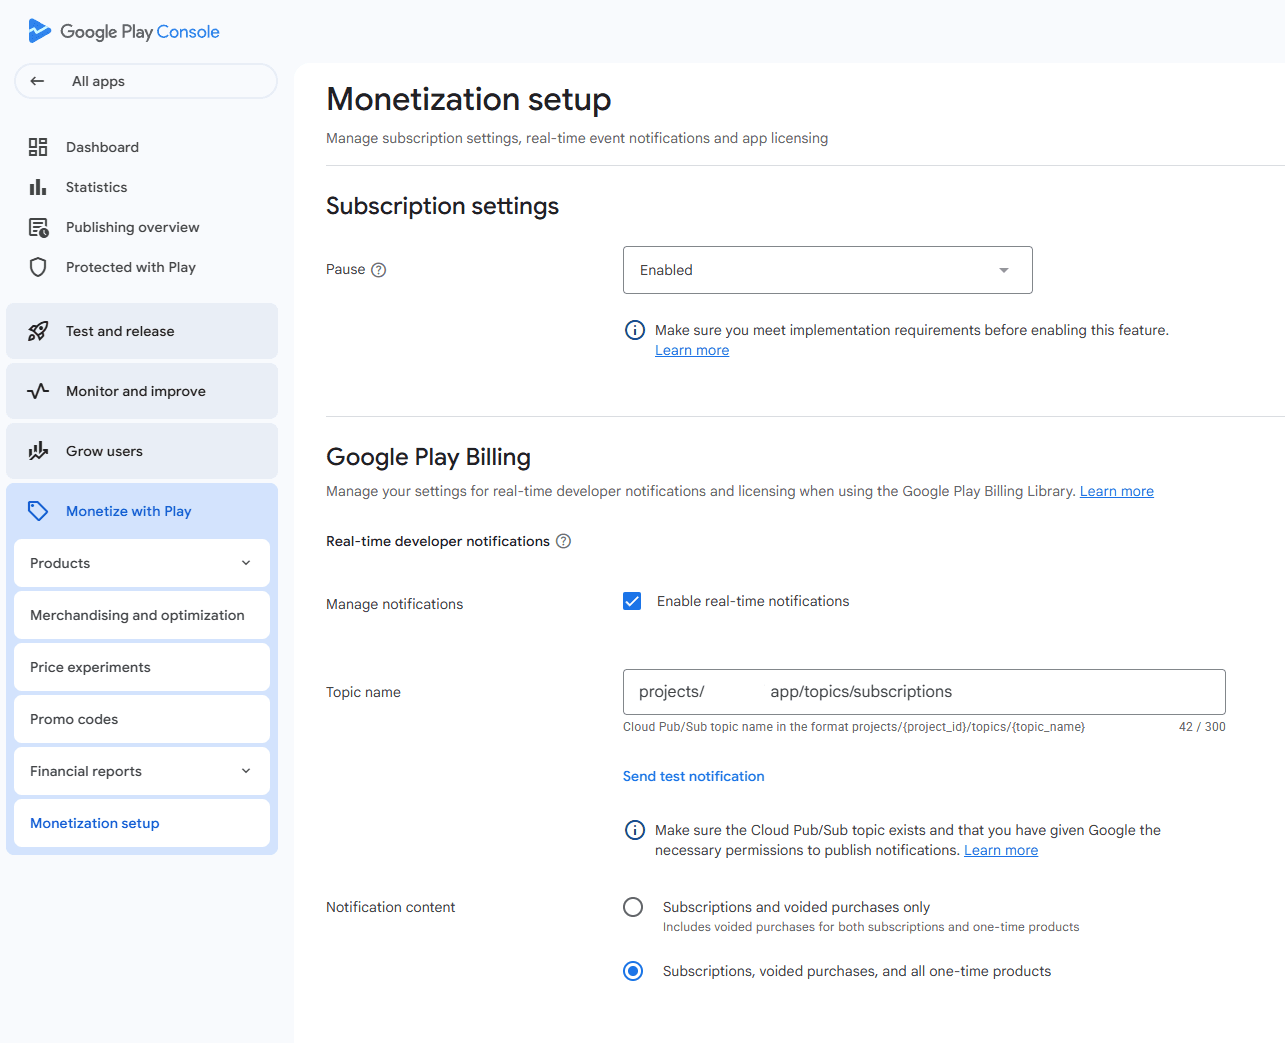
In Play Console Monetization setup, enable real-time developer notifications, set the topic name, and choose the notification content. - Paste the full Pub/Sub topic name into Topic name. The topic name should look like
projects/{cloudProjectId}/topics/{topicName}. - Do not paste the SubTru Webhook URL here. This field only gets the Pub/Sub topic name.
- Make sure
[email protected]has Pub/Sub Publisher access on the topic. This is the Google Play service account that publishes notifications into your Pub/Sub topic. To check it, open the topic in Google Cloud Console, open Permissions, and look for that service account with the Pub/Sub Publisher role. If it is missing, use Add principal to grant access, paste the service account email, and choose Pub/Sub Publisher.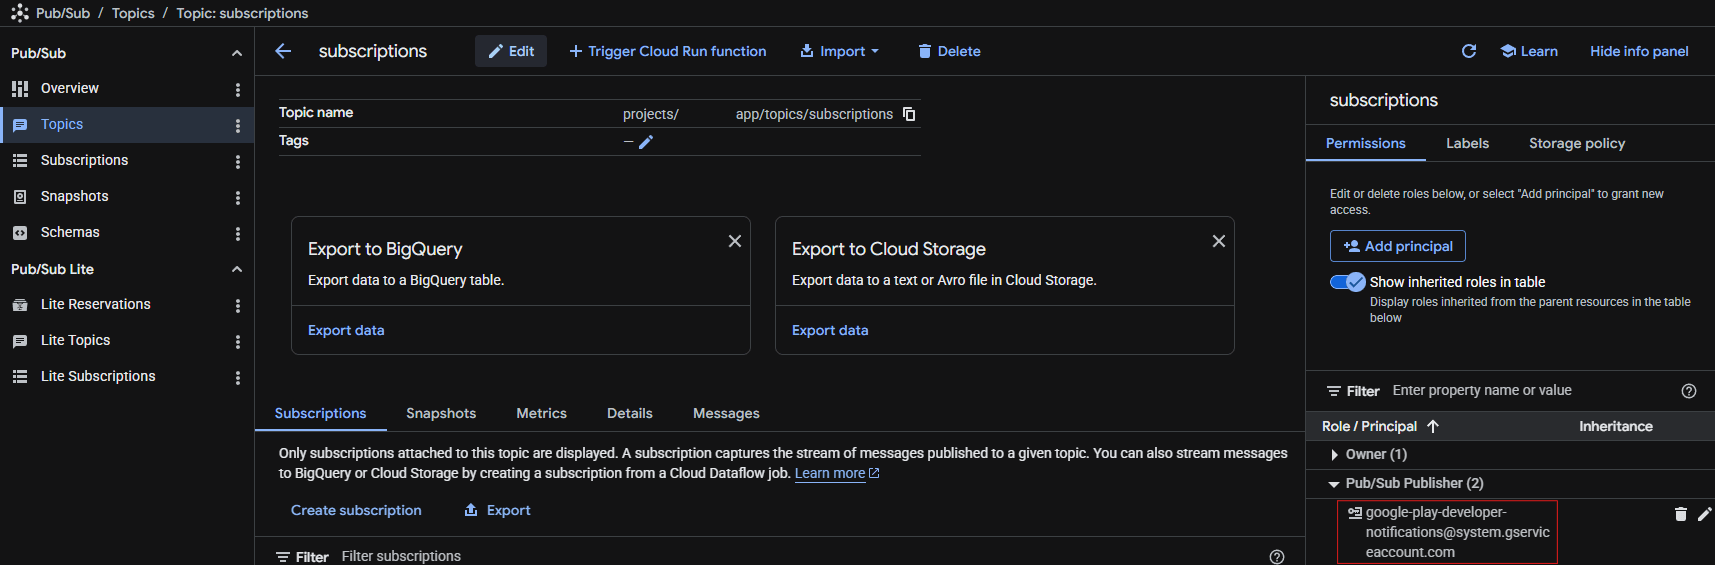
On the Pub/Sub topic permissions page, confirm the Google Play developer notifications service account has Pub/Sub Publisher access.
Google's Real-time developer notifications setup docs show this Play Console path.
- Save the Google settings in SubTru. Return to the SubTru dashboard and finish the Google provider config for this project.
- While still in the SubTru Test environment, navigate to the Google provider config from the Webhooks Setup page.
- Save the Android package name from Play Console. You can find it on the app dashboard under App details, or in your Android app's Gradle config as
applicationId. It usually looks likecom.example.app. - Set Pub/Sub auth service account email to the service account email you copied when you enabled authentication on the Google Cloud Pub/Sub push subscription. If you did not copy it, open the push subscription in Google Cloud Console and check the Push authentication service account on the subscription details page. This is the service account Pub/Sub uses to identify itself to SubTru when it calls the SubTru Google Webhook URL.
- Paste the service account JSON SubTru should use for Android Publisher API access. This may be the same service account you chose for Pub/Sub push authentication, but it does not have to be. In Google Cloud Console, open IAM and Admin, then Service Accounts. Create or select the service account SubTru should use to call Google Play. Under Actions, select Manage Keys, choose Add key, then Create new key, and choose JSON. Google downloads a
.jsonfile. Paste the full file contents into SubTru. Google only shows the private key when the file is created, so keep it secure.Google may warn that service account keys are sensitive. That warning is expected. SubTru currently uses this JSON key server-side to call the Android Publisher API and fetch subscription state after RTDN arrives. It also lets SubTru acknowledge supported auto-renewing purchases. Use a dedicated service account, give it only the Play access needed for subscriptions, and do not commit the JSON file or add it to your app. SubTru encrypts saved provider credentials at rest.
After you save the JSON in SubTru and confirm the connection works, remove the downloaded copy from your computer or store it only in your team's approved secret manager.
- In Play Console, make sure that same service account has access to the app through the Google Play Developer API setup. It needs permission to read subscription purchase state.
- SubTru does not ask for Pub/Sub audience because it derives the expected audience from the Google Webhook URL.
After this provider config is saved, return to Play Console and use Send Test Message. This confirms Google Play can publish to the topic and SubTru can receive the pushed message. In SubTru, check the Events tab for a
google.test_notificationevent marked received. This only proves delivery because the test notification does not contain a real subscription purchase. - Set up a Google Play license tester. In Play Console, add the tester account and install your app from a test track such as internal testing or closed testing. Test purchases do not charge the tester and usually renew faster than production subscriptions. Google's Play Billing testing docs explain license testers, faster renewals, and Play Billing Lab state changes.
- Pass the SubTru user ID to Google Play Billing. In your Android purchase flow, set
setObfuscatedAccountIdto the user ID, or to a stable value your app can map back to that user. Use the same user ID when you check access in SubTru. Google documents this field on BillingFlowParams.Builder and warns not to put cleartext personal data in it.val params = BillingFlowParams.newBuilder() .setProductDetailsParamsList(productDetailsParams) .setObfuscatedAccountId(externalUserId) .build() - Create the subscription through your app's Google Play test flow. Use the same Play Billing flow your app will use for real subscriptions, but install the app through the test track and buy with a license tester account. For now, keep Google Play tests to one Android package per project, one auto-renewing line item per purchase token, and standard auto-renewing subscriptions. Prepaid plans, installment subscriptions, and Google add-ons are outside this test path.
- Check that SubTru received the Google notification. In SubTru, stay in Test mode and open the Events tab. Look for a Google subscription event with a success status. It should show the same user ID you passed to Google Play Billing after SubTru fetches the purchase from Google. Then open the User access explorer for that user ID and confirm access changed.
Verify the result in SubTru
After the provider sends a test subscription event, open the SubTru webhook Events tab in Test mode. A passing event should show the provider, test environment, event type, success status, and the user ID you passed to the provider. Delivery-only test events may not include a user ID, but subscription access tests should.
Then open the User access explorer in Test mode and search for the same user ID. The Access section should show the product and whether the user has access. The Subscription details section should show the provider, product ID, price ID when available, status, and period end.
Your backend can check the same answer through the access endpoint with a subtru_test_... API key.
curl -H "Authorization: Bearer subtru_test_..." \
  "https://api.subtru.com/v1/projects/{projectId}/users/{externalUserId}/access"
Read how subscription access works for more on what this endpoint returns.
Common subscription testing mistakes
- Using one webhook URL for test and live traffic. Create separate SubTru webhook keys for Test and Live.
- Forgetting the user-linking field. Stripe needs
subtru_external_user_id, Apple needs a UUIDappAccountToken, and Google needssetObfuscatedAccountId. - Treating delivery tests as subscription tests. Stripe generated CLI events, Apple
TESTnotifications, and Google Play Send Test Message can prove delivery without proving access. Use a Stripe test subscription, Apple sandbox purchase, or Google Play license tester purchase for the final test. - Using client-only test tools as server webhook tests. StoreKit configuration files and Google static response product IDs such as
android.test.purchasedare useful for app-side purchase handling. They do not prove that provider webhooks, provider API fetches, and SubTru access checks all work together. - Ignoring accelerated sandbox timing. Apple sandbox and Google Play license tester renewals can happen much faster than production renewals. Check provider docs before treating timing as a bug.
- Skipping the Events tab. A failed event often names the exact issue, such as environment mismatch, missing provider config, missing user ID, or an unsupported purchase type.
How this fits across providers
Each provider has its own test flow. The final goal is the same across all of them. SubTru receives the event, saves subscription state, and returns access for the right product. For provider details, see the docs on Stripe subscription webhooks, Apple subscription webhooks, and Google Play subscription webhooks.
Frequently asked questions
To test with SubTru, create Test webhook keys for the providers you use. Point provider test traffic at those URLs. Then check the Events tab and the User access explorer. When the test works, your app can call the same access endpoint with a subtru_test_... API key.
Sources
- Stripe webhook endpoint events
- Stripe webhook signature verification
- Stripe CLI usage
- Stripe Billing testing
- Stripe Event object
- Stripe Checkout Session creation
- Apple App Store Server Notification testing
- Apple notification types
- Apple App Store Server Notification setup
- Apple request test notification
- Apple get test notification status
- Apple App information reference
- Apple sandbox subscription renewal settings
- Apple Sandbox Apple Account setup
- Apple appAccountToken
- Google Play Billing testing
- Google Play Real-time developer notifications setup
- Google Play real-time developer notification reference
- Google Play BillingFlowParams.Builder
- Google Play purchases.subscriptionsv2.get
- Google Cloud Pub/Sub push authentication
- Google Cloud service account JSON keys
- Google Cloud service account key best practices